Tutorials cover a good range of topics for beginner and intermediate Python programmers. The tutorials include a datacamp-light widget for running the code on the page. The tutorials set challenges which can be answered on the page. Challenges are my favourite way of learning. Solutions are also provided.
There are a few tricks to getting PyCharm to work with Anaconda. This post demonstrates running a flask web application on Windows 10 with the only Python installation being Anaconda. The source code we will use is a git repository so you will need git installed to proceed. (see https://git-scm.com). The screenshots use PyCharm Edu which is the same as PyCharm Community with the edu-tools plugin. You don’t need this plugin. Also, we do not have the Anaconda plugin which I think is only available for PyCharm Pro.
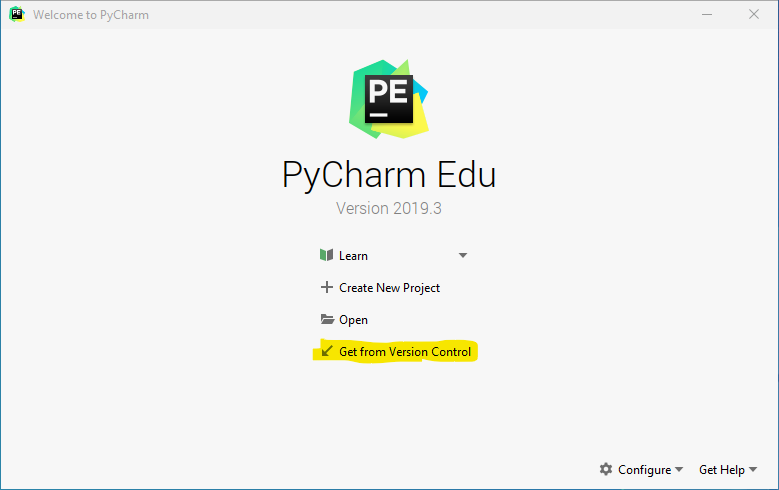
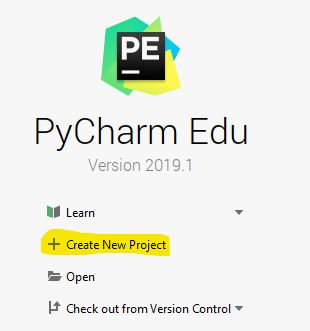
To begin, run PyCharm. You may need to close any open projects to see the splash screen. (File menu > Close project).
1. You can clone a git repository straight from the splash screen. Click “Get from Version Control”
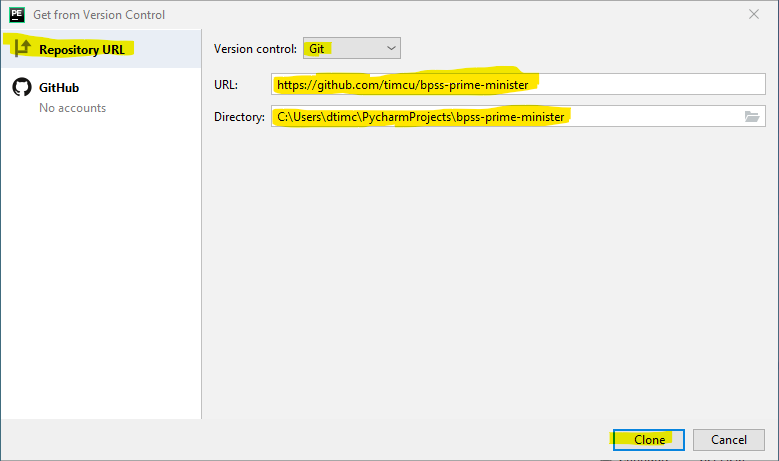
2. Select “Repository URL” and fill in the details of the repo on github. Version control: Git URL: https://github.com/timcu/bpss-prime-minister Directory: C:\Users\<username>\PyCharmProjects\bpss-prime-minister Click “Clone” to clone the repository
3. Click “Yes” to open the project directory in PyCharm.
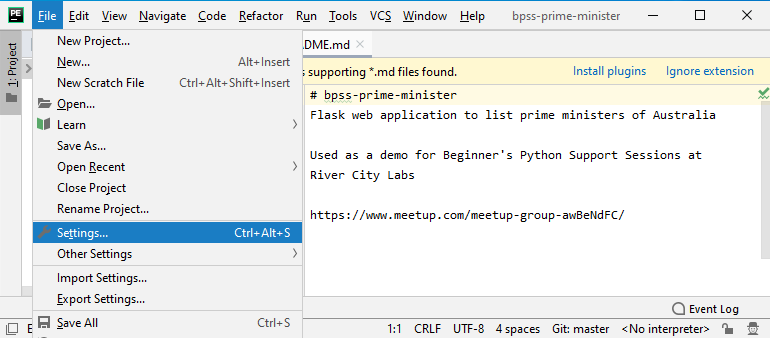
4. Now you need to configure PyCharm to use an Anaconda virtual environment. This is done in “File” > “Settings…” in Windows/Linux or “PyCharm” > “Preferences” in Mac.
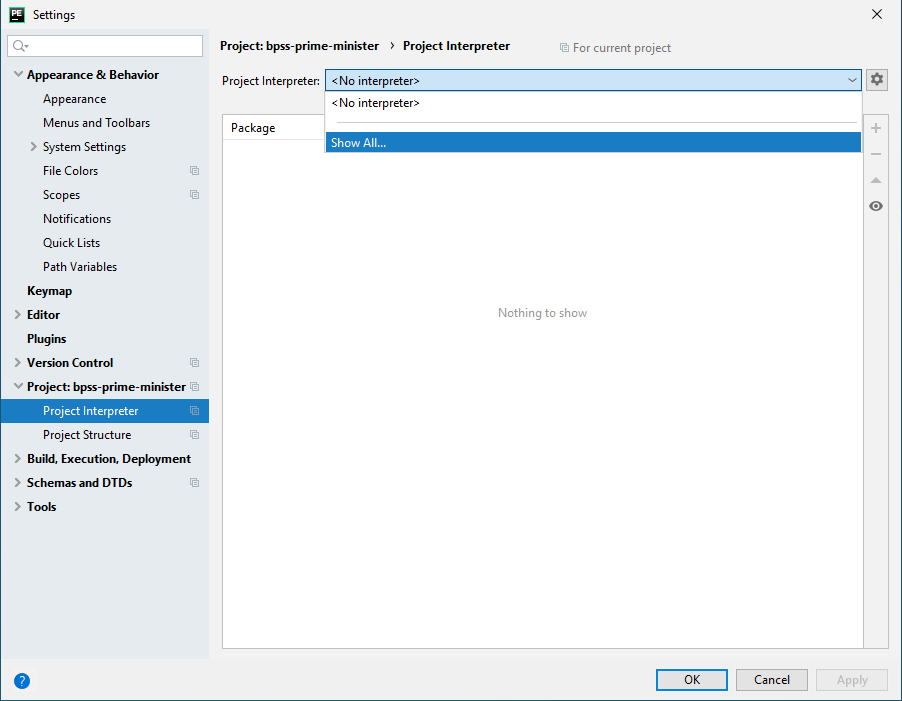
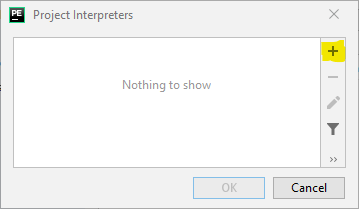
5. In settings, select the Project Interpreter for this project. As this is the first project, no Interpreters are currently set up. Click on “Show All…” in the Project Interpreter pull down menu.
6. The list of Project Interpreters is empty, so click on the “+” to create a new one.
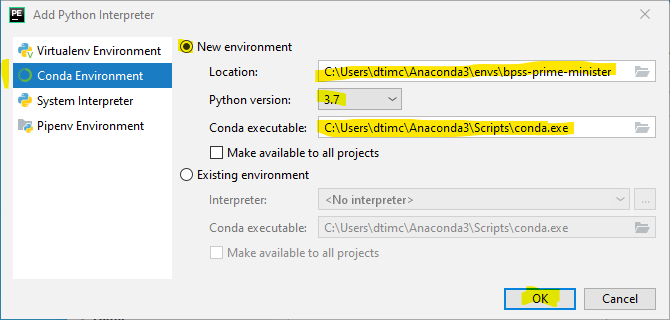
7. Be sure to select “Conda Environment” in the left panel. If you were using Python without Anaconda you would select “Virtualenv Environment”. Selecting “System Interpreter” is not best practice because you will pollute the system python installation with custom modules making it difficult to replicate environments on different computers. “Pipenv Environment” is for those who prefer using pipenv to manage environments. This is more a legacy requirement as “Virtualenv Environment”, which these days uses venv rather than virtualenv, can do anything pipenv can do.
Conda environments are stored in the Anaconda root directory. I installed Anaconda for my use only so this directory is C:\Users\<username>\Anaconda3 . If you have installed Anaconda for all users it will probably be C:\Anaconda3 .
The conda environment can be called anything you want but I normally call it the same name as the project so I know what it is used for. In this case I have named it “bpss-prime-minister”.
Click “OK” to create the new conda environment. Then click “OK” on the “Project Interpreters” window to return to “Settings”.
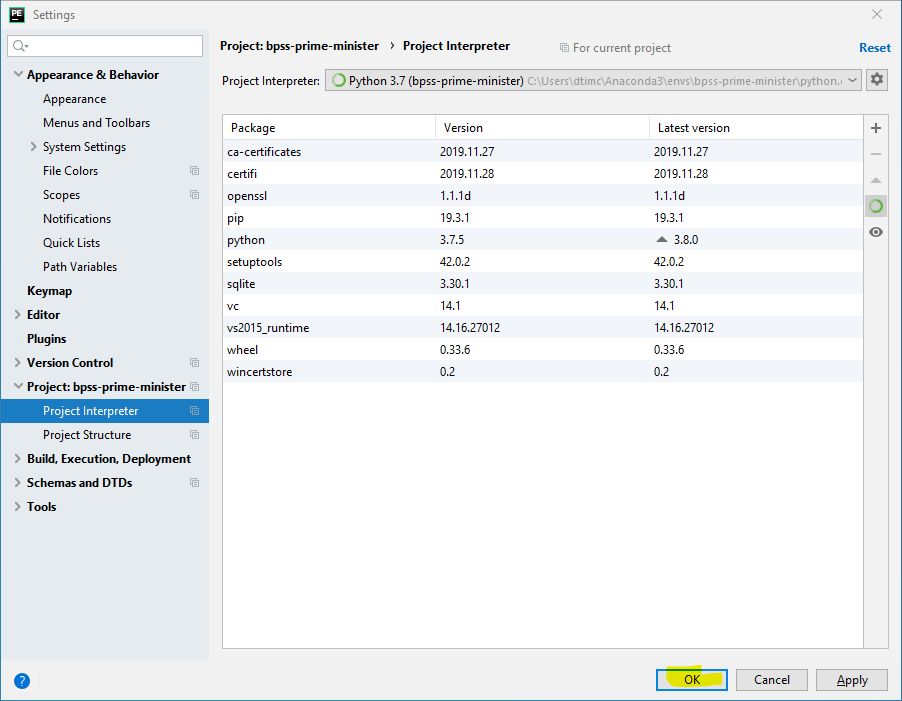
8. Click “OK” ensuring the newly created environment is now selected as the Project Interpreter in the pull down menu.
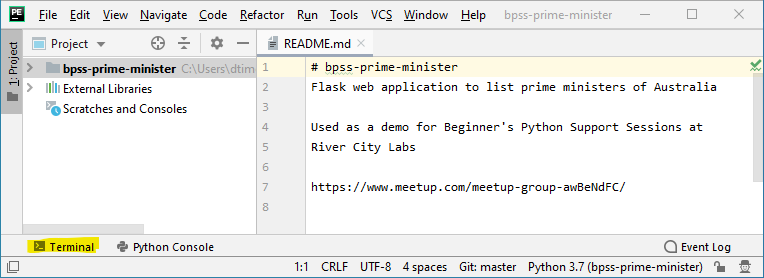
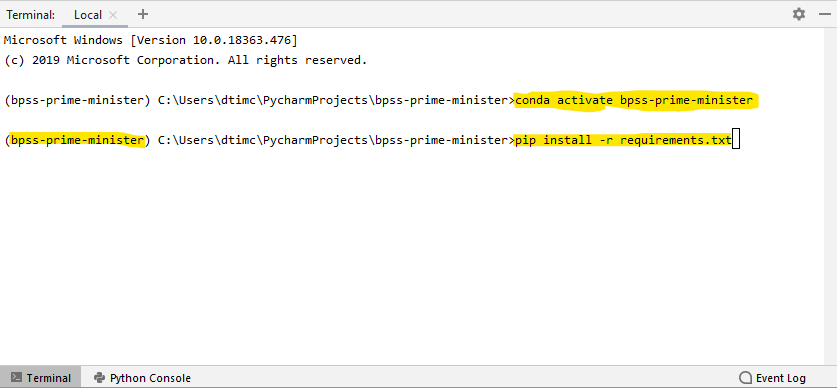
9. Open Terminal pane by clicking on “Terminal” in the bottom left of the project window.
10. In the future, when you open Terminal, it will automatically activate the correct conda environment. It may even activate it now as it has done for me in the screenshot. However, if you opened Terminal before creating the environment, it will be using base environment, indicated by (base) at the beginning of each prompt in Terminal. Activate the new conda environment by typing:
conda activate bpss-prime-minister
After activating, each command line prompt should start with (bpss-prime-minister) .
Now you need to install the library requirements which are stored in requirements.txt. Normally you would type conda install --file requirements.txt or even leave it for PyCharm to automatically install requirements, but in this case conda has problems installing flask_bootstrap and python-dotenv. To solve these issues I have decided to use pip to install all the requirements. PyCharm Terminal has already put me in the correct directory so I can just use the filename without the path.
pip install -r requirements.txt
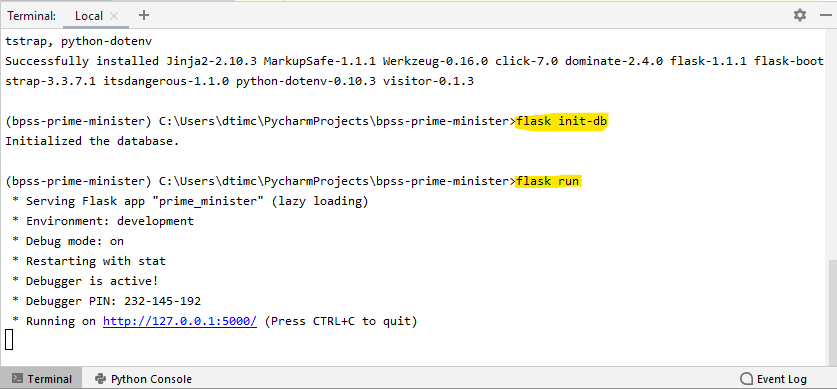
11. After all the requirements are installed you can launch the app. The first command is a custom command defined by the app to initialise the database. In Terminal type:
flask init-db
The second command launches the app in a dev only web server. In Terminal type:
flask run
12. You can click on the displayed hyperlink in Terminal, or open a web browser such as Firefox and type in the address.
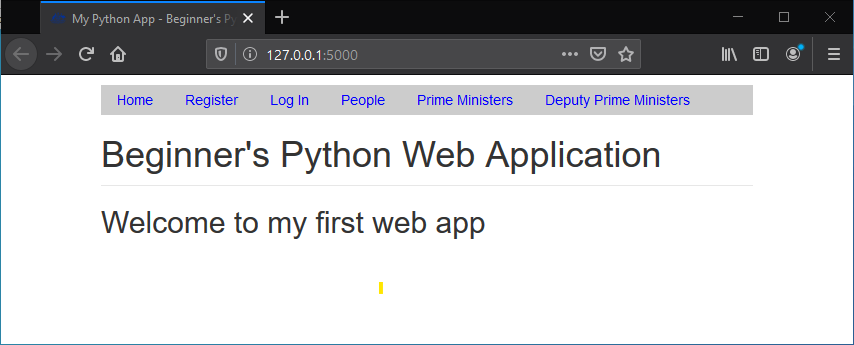
Congratulations. You are now running a flask web application on your Windows computer using only Anaconda and PyCharm. To stop the application, go back to Terminal and type ctrl-c, by holding down the “Ctrl” key, pressing the “c” key, and then releasing both keys.
On their website, Flask provide a simple “Hello World!” demo that you can run from the command line. I have written this post to show how the same thing can be achieved using PyCharm Edu. It is more steps, but once it is set up, the web application can be run by a menu item or keystroke in PyCharm Edu without ever having to use the terminal. Jetbrains recommend PyCharm Professional for Flask development work but with this technique all you need is one of the free IDEs PyCharm Edu or PyCharm Community.
TL;DR (too long; didn’t read)
If you are already familiar with PyCharm Edu, the steps are essentially:
Create a new python project with a virtual environment, and “Flask” in your requirements.txt file.
Create a new Python file hello.py as per the Flask demo.
If you are using PyCharm Edu you will need to enable the “Run” menu.
These screen shots have been taken from PyCharm Edu 2019.1 using Python 3.7.3 on Windows 10 Pro.
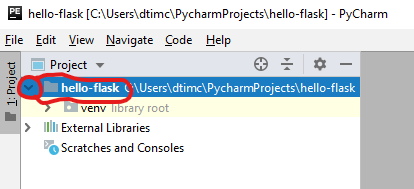
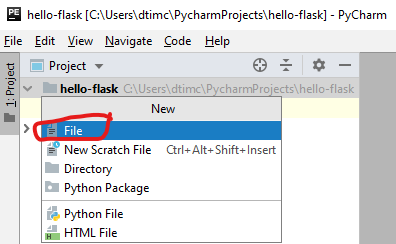
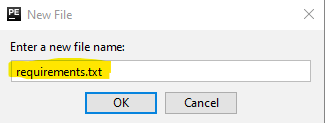
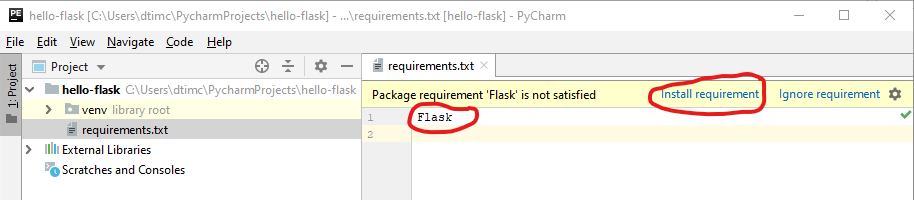
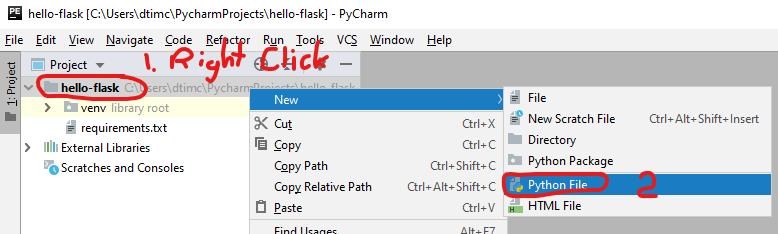
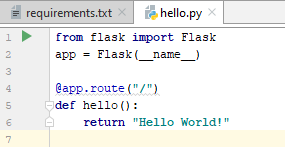
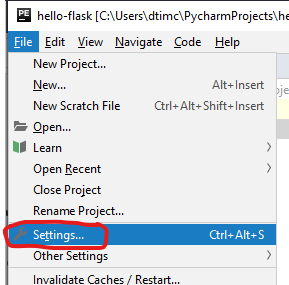
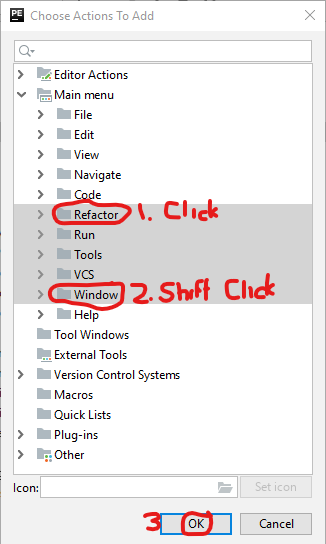
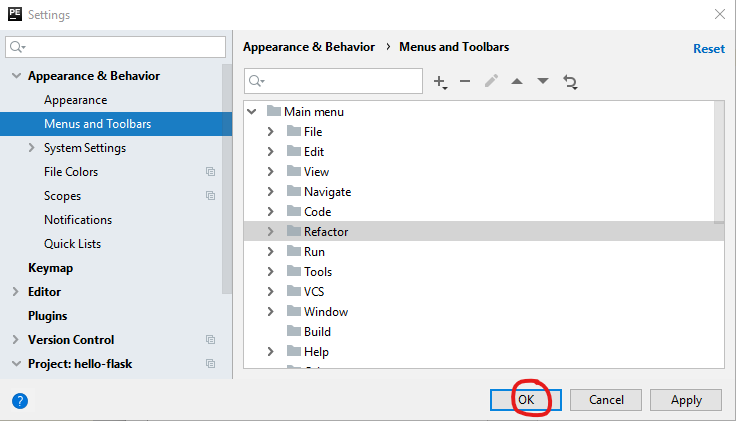
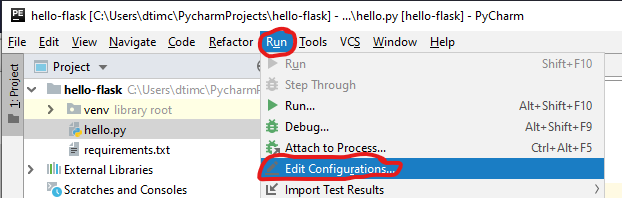
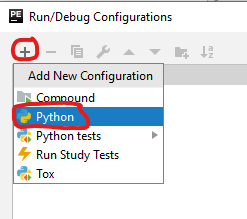
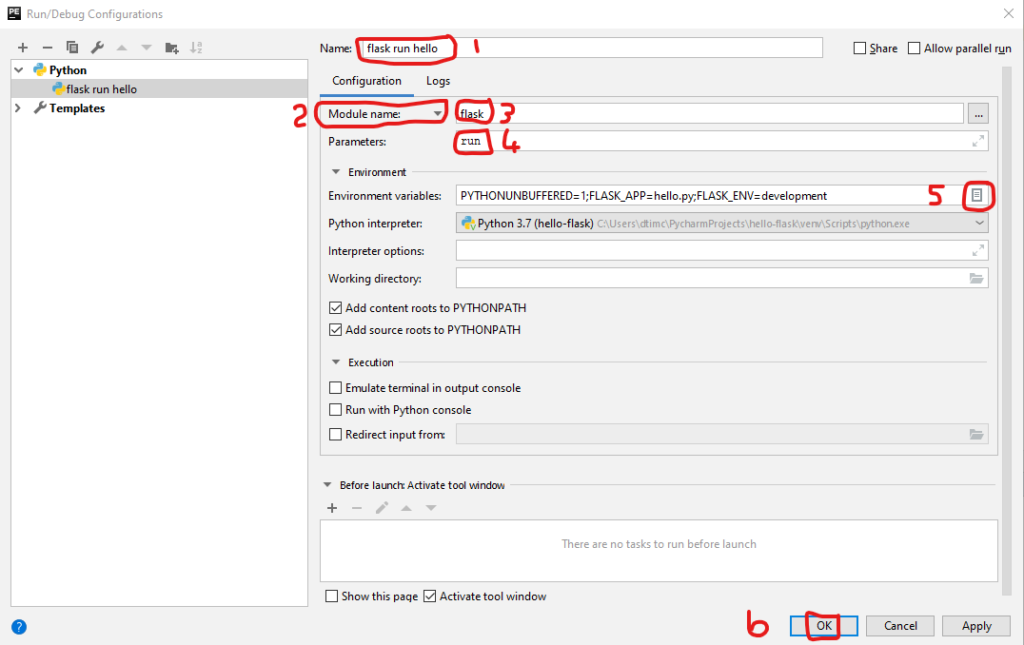
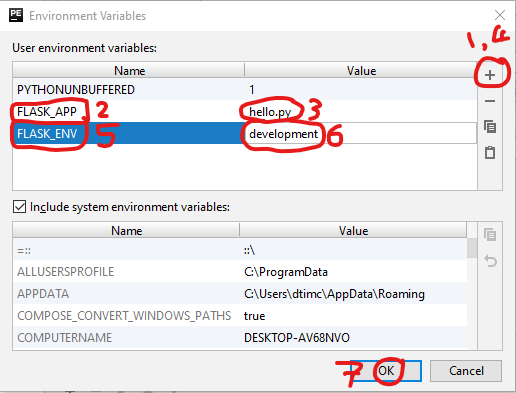
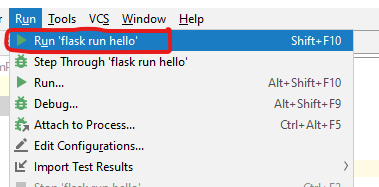
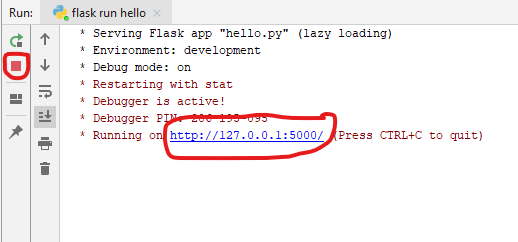
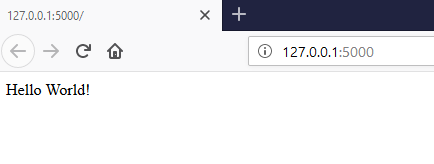
Create a new project in PyCharm EduName your project “hello-flask”. This will also create a new virtual environment.Click on “hello-flask” to select the project folder. Then click on > next to “hello-flask” to expand the folder and show the contents. Depending on where you are saving your virtual environments you may or may not see “venv”.Now that the project folder is selected, you can select “New…” from the “File” menu to create a new file in the project folder.A floating menu will appear asking you the type of file. We are creating a text file so choose “File” which can be used for any file type.Name the file requirements.txt and click “OK”.In the requirements.txt type the word “Flask”. This replaces the step “pip install Flask” from the command line demo. After you have typed in “Flask” click on the recommendation to “Install requirement”. The recommendation may not come straight away so continue on to the next steps and it should appear before you get to running the web application.To create a new Python file, right click on the project folder and select New > Python File.Because PyCharm knows it is going to be a Python file, we don’t need to type in .py on the end. Just type in the name “hello” and click “OK”.In hello.py, type in the code from the Flask “Hello World!” demo. The file will get saved automatically.If you are using PyCharm Community Edition you can skip the next three steps which are only required to enable some menus which are hidden in PyCharm Edu but visible in PyCharm Community Edition. Click on “Settings…” in the “File” menu. On Mac this menu is called “Preferences”.The main menu is missing some menus so: 1. Expand “Appearance and Behaviour” 2. Select “Menus and Toolbars” 3. Expand “Main menu” 4. Select “Code” menu so we can add new menus after it 5. Click on “+” to add extra menus 6. Click “Add Action…”Select all menus between “Refactor” and “Window” and click on “OK”.The menus are now included so click “OK”To run a flask app we need to create a “run configuration”. Select “Edit configurations…” from the “Run” menu.Click “+” to add a new configuration and select “Python”.1. Name your configuration “flask run hello” or something else if you prefer. 2. Change label from “Script path:” to “Module name:” 3. Type “flask” as the module name 4. Type “run” as the parameter 5. Configure environment variables by clicking box. (See next screenshot) 6. After setting environment variables (next screenshot), click “OK”1. “+” to add a new environment variable 2. Name it “FLASK_APP” 3. Give it value “hello.py” 4. “+” to add another environment variable 5. Name it “FLASK_ENV” 6. Give it value “development” 7. Click “OK” to return to previous dialog box and click “OK” again.Now you can run the builtin web application server by selecting “Run ‘flask run hello'” from the Run menu. If the first item does not say ‘flask run hello’ then choose “Run…” (third item in menu) and select ‘flask run hello’ from the popup menu.A run status pane will open at the bottom of the screen. You can click on the URL to see the outpu of your web application in a web browser. Click the red square to stop your application.This is what your web browser should show you. Yay!!! 🙂
Pythonator makes Python coders out of gamers. It runs on a Minetest game server and comes with a companion PyCharm Edu course which teaches gamers how to overcome the obstacles in the game by writing Python programs.
A Pythonator workshop will be held at QSITE conference 2018. Attendees should bring a Windows, Mac or Linux laptop. Android and iPads are not suitable. If you don’t already have the following software installed, please install it prior to attending.
Send an email to tim@triptera.com.au to request a free account on the server. Then you can try out the exercises on the server for a few weeks after the completion of the conference.
Detailed installation – Windows 64 bit
Python 3
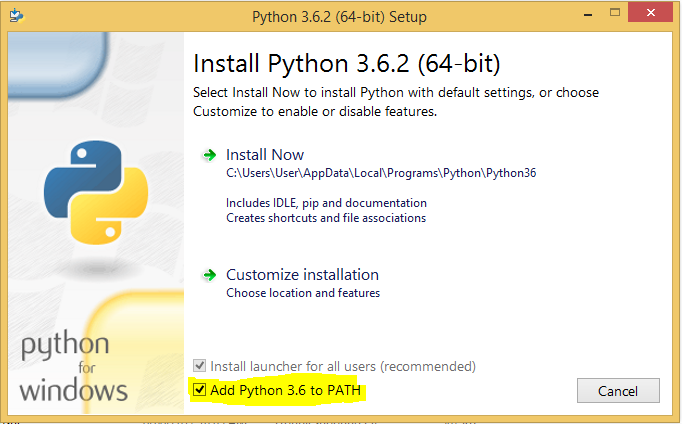
From the Python website download Python 3.6.5. Default settings are fine during the install although I recommend users also select “Add Python 3.6 to PATH” which is unticked by default.
PyCharm Edu 2018.1.2
Download and install PyCharm Edu v2018.1.2.
Download the Pythonator companion courses for PyCharm Edu. Do not unzip or extract the companion courses.
Extract the zip file into your Documents directory so you have a folder Documents\minetest-0.4.17.1-win64.
In File Explorer right-click on Documents\minetest-0.4.17.1-win64\bin\minetest.exe and select “Send to > Desktop (Create shortcut)”.
Now you can run Minetest by double-clicking the Minetest icon on your desktop.
Detailed installation – Mac
This section is for users of macOS 10.13 who are uncomfortable with using the command line. If you are comfortable using the command line, or running an older version of macOS, see the next section.
Python 3
From the Python website download and install Python 3.6.5. Default settings are fine during the install.
PyCharm Edu 2018.1.2
Download and install PyCharm Edu v2018.1.2.
Download the Pythonator companion courses for PyCharm Edu. Do not unzip or extract the companion courses. Safari users need to ensure Safari doesn’t ‘open “safe” files after downloading’ which automatically unzips these files. This is the bottom setting in the General tab of Safari Preferences…
If you are running macOS 10.13 you can download a prebuilt version of minetest 0.4.17.1. To install, open the downloaded dmg file and drag the minetest icon on to the Applications icon. To run the first time right-click the minetest icon in Applications folder and click “Open”. There might be a security warning but you will then be able to click “Open” button.
Detailed installation – Mac (using the command line)
This section is for those comfortable with the Mac command line using Terminal application. I prefer installing using Homebrew because it matches the build of minetest to my version of macOS and it is easy to install updates.
Python 3 and Minetest
Type the following in Terminal to install XCode, Homebrew, Python 3 and Minetest if you have not installed them already.
The last line opens the installed minetest folder in Finder. Double-click the minetest icon. While minetest is running, right-click on the icon in the dock and select “Options > Keep in Dock” to make it easier to run next time.
PyCharm Edu 2018.1.2
Download and install PyCharm Edu v2018.1.2.
Download the Pythonator companion courses for PyCharm Edu. Do not unzip or extract the companion courses.
From the Python website download Python 3.6.5. Default settings are fine during the install although I recommend users also select “Add Python 3.6 to PATH” which is unticked by default.
If you want to run the PyCharm Edu Minetest course developed by Triptera you will need a licence. Licences are free if you are running the course in 2018. Please contact Triptera for a licence. Please provide details where you would like to use the software. The licence covers the “builder_police” mod for Minetest and the “Ninja 2 minetest course” for PyCharm Edu, both of which are available with open source. All other components are covered by free and open source licences. Support is available to assist you setting up the PyCharm Edu Minetest course.
What do students learn
Students doing my PyCharm Edu Minetest course learn the following mathematical concepts
3 dimensional coordinate systems
formulae including uses of integer division and modulo and absolute values
They also learn the following python coding skills
program flow
variables
loops
conditionals
data types including ints, strings, lists, tuples, dictionaries, JSON strings
functions
modules
Minetest
Minetest is a Minecraft clone allowing players to build block structures in a virtual world. To set up your PyCharm Edu Minetest course server follow instructions at Python programming course using Minetest
Minetest is open source free software which runs on Linux, Mac, Windows plus it even runs on Android, iOS and Haiku. At CoderDojo we used to run this course in Minecraft but have now switched to Minetest because of its many advantages.
Minetest is free so ninjas don’t have to buy a Minecraft licence.
Minetest passwords can be set by server op. This is much better than Minecraft which would not ask for the password when ninjas were at home, but as soon as they joined our LAN at CoderDojo Minecraft asked for their password which they couldn’t remember.
Minetest can run on a LAN with no Internet access. Minecraft users would have to log in to the unreliable library wifi to enter their Minecraft password and then switch networks to our LAN to join the virtual world.
Minetest is better on low budget hardware. I was running a server on a 2GB RAM Core 2 Duo Linux Mint headless (no monitor) desktop PC.
Minetest has an excellent modding interface that encourages mods unlike Minecraft which obfuscates its java code to make modding harder. The Lua modding language has surprisingly good performance. I hadn’t used Lua before but I picked it up quite quickly and it is apparently common in other games which need scripting. I did have trouble getting network sockets working in Lua on Windows but eventually solved that problem.
Minetest does not do mobs (monsters and other non player characters) as well as Minecraft. Mobs in Minetest are not native so have to be implemented in mods using the Lua scripting language. This has not been an issue for this course which we run without mobs for better performance.
Op Commands
Running the PyCharm Edu Minetest course is mostly automatic. However there are a few custom commands you can enter through in-game chat to manage the world
/set_player_task player_name task_number
resets a players tasks (replace player_name with player’s name, task_number = 0 to start again)
example /set_player_task tim 1
/set_jail_free_task 1
sets the task a player needs to complete to get out of jail
There are also some useful built-in commands
/help
provides help on chat commands
/help all
lists all the chat commands
/help command
help on a specific chat command. e.g. /help time
/time 6:00
set clock to morning time so players are not in darkness. If this becomes onerous, consider setting the “Time speed” to zero in Settings > Advanced settings > Server / Singleplayer > Game > Time speed
/grant player_name irc_builder
gives a player privileges to use building commands over IRC (should be automatic for new players) will show player’s list of existing privileges.
example /grant tim irc_builder
/revoke player_name irc_builder
opposite of grant
/teleport player_name x y z
move player to new coordinates. e.g. /teleport tim 95 12 20 see help for variations
/setpassword player_name new_password
sets player’s password in Minetest. Password can not be blank or contain spaces if it is to work with ircbuilder.
example /set_password tim sesame
/privs
see what privileges you have
You can even send any of these commands to the server over IRC. Send private messages to the server botnick (eg mtserver). The first message is to login. The second and subsequent messages are the same as the chat commands but replace the / with cmd. Below is an example IRC session. Replace mtuser and mtuserpass with the minetest user and password you want to connect as. The minetest username can be different to the IRC nick name.
login mtuser mtuserpass

cmd privs

cmd time 6:00
You can even use python console to send commands if you don’t have an IRC client. mtuser needs to be the serverop player name
from ircbuilder import MinetestConnection
from coderdojo import ircserver, mtuser, mtuserpass, mtbotnick, channel
mc = MinetestConnection.create(ircserver, mtuser, mtuserpass, mtbotnick, channel)
mc.send_cmd("privs")
mc.send_cmd("time 6:00")